توضیحات
با ارائه تصاویر WebP و AVIF، سرعت وب سایت خود را با استفاده از بهینه ساز آسان تصویر ما افزایش دهید. با جایگزینی فایلها در فرمتهای استاندارد JPEG، PNG و GIF با فرمتهای WebP و AVIF، میتوانید بیش از نیمی از حجم صفحه را بدون کاهش کیفیت ذخیره کنید.
پس از نصب افزونه دیگر نیازی به انجام کاری ندارید. تصاویر فعلی شما به فرمت جدید تبدیل خواهند شد. هنگامی که بهینه سازی تصویر توسط بهینه ساز تصویر ما به پایان رسید، کاربران به طور خودکار تصاویر جدید و بسیار سبک تر از تصاویر اصلی دریافت خواهند کرد.
از امروز، بیش از 90% oکاربر از مرورگرهایی استفاده میکنند که از قالب WebP پشتیبانی میکنند. زمان بارگذاری وب سایت شما تا حد زیادی به حجم آن و سطح بهینه سازی تصویر بستگی دارد. با استفاده از مبدل WebP ما، میتوانید بدون تلاش زیاد سرعت سایتتان را در چند ثانیه افزایش دهید!
این هم برای کاربرانی که نیازی به دانلود داده های زیادی ندارند و هم برای سروری که بارگذاری کمتری دارد، سودآور خواهد بود. به یاد داشته باشید که یک وب سایت بهینه شده بهتر بر رتبه گوگل شما نیز تاثیر می گذارد. بهینه سازی تصویر بسیار مهم است.
پشتیبانی AVIF
اکنون در نسخه PRO می توانید از AVIF به عنوان فرمت خروجی تصاویر خود استفاده کنید. فرمت AVIF یک پسوند جدید است – جانشین WebP است. AVIF به شما امکان می دهد حتی به سطوح بالاتری از فشرده سازی تصویر دست یابید و کیفیت تصاویر تبدیل شده پس از بهینه سازی تصویر بهتر از WebP است.
این چطوری کار میکنه؟
- اگر به تازگی افزونه را نصب کرده اید، می توانید با یک کلیک تصاویر را بهینه کنید. حجم تصویر پس از تولید webp کوچکتر خواهد شد!
- تصاویر جدیدی که در کتابخانه اضافه میشوند بصورت خودکار تبدیل خواهند شد.
- Our image optimizer does not modify your original images in any way. This means security for you and your files.
- When the browser loads an image, our plugin checks if it supports the WebP format. If so, the image in WebP format is loaded.
- The plugin does not make redirects in default mode, so the URL is always the same. Only the MIME type of the image changes to
image/webp. - بدون تغییر مسیر به معنای عدم وجود مشکل حافظه پنهان، عملکرد سریعتر و بدون مشکل وب سایت شما است. اگر میخواهید درباره نحوه عملکرد آن بیشتر بدانید، سؤالات متداول افزونه را در زیر بررسی کنید.
- فرقی نمی کند که تصویر به عنوان یک تگ
imgHTML نمایش داده شود یاbackground-imageاستفاده کنید. همیشه کار می کند! - در صورتی که بازنویسی توسط قوانین از فایل htaccess. مسدود شود، حالتی در دسترس است که تصاویر را از طریق فایل PHP بارگیری می کند. سپس آدرس های تصویر تغییر می کنند، اما منطق عملکرد مانند حالت پیش فرض است.
- نتیجه نهایی پس از بهینه سازی تصویر این است که کاربران شما کمتر از نیمی از داده ها را دانلود می کنند و خود وب سایت سریعتر بارگذاری می شود!
- شما چیزی را از دست نمی دهید – اگر مجبور باشید افزونه را حذف کنید، همه چیز را بعد از خود حذف می کند. هیچ اثری از خود باقی نمی گذارد، بنابراین می توانید به راحتی آن را بررسی کنید.
تبدیل WebP – این آینده بهینه سازی تصویر است!
اکنون تصاویر را بهینه کنید و وب سایت خود را به سطح جدیدی ارتقا دهید! افزونه را نصب کنید و از وب سایتی که با بهینه سازی تصویر سریعتر بارگذاری می شود لذت ببرید. مطمئنا شما و کاربرانتان از آن قدردانی خواهید کرد.
پشتیبانی از دایرکتوری اضافی
شما می توانید WebP را تبدیل کنید و تصاویر را نه تنها از پوشه /uploads بلکه از /plugins و دایرکتوری های /themes نیز بهینه کنید. این اجازه می دهد تا یکپارچه سازی کامل با فرمت WebP!
Support to the development of plugin
ما ساعت ها روی توسعه این افزونه کار می کنیم. پشتیبانی فنی نیز به زمان زیادی نیاز دارد، اما ما این کار را انجام می دهیم زیرا می خواهیم بهترین افزونه را به شما ارائه دهیم. ما از نصب هر افزونه جدید لذت می بریم.
اگر می خواهید از آن قدردانی کنید، می توانید نسخه PRO را امتحان کنید. علاوه بر این، به عملکردهای اضافی دسترسی خواهید داشت که به شما امکان می دهد حتی به نتایج بهینه سازی تصویر بهتری دست پیدا کنید.
لطفاً سؤالات متداول زیر را نیز بخوانید. ممنون از اینکه با ما بودید! پشتیبان فارسی: مسعود نجار خدابخش
عکسهای صفحه

تب تنظیمات عمومی افزونه 
تب تنظیمات پیشرفته افزونه 
بهینه سازی انبوه تصاویر 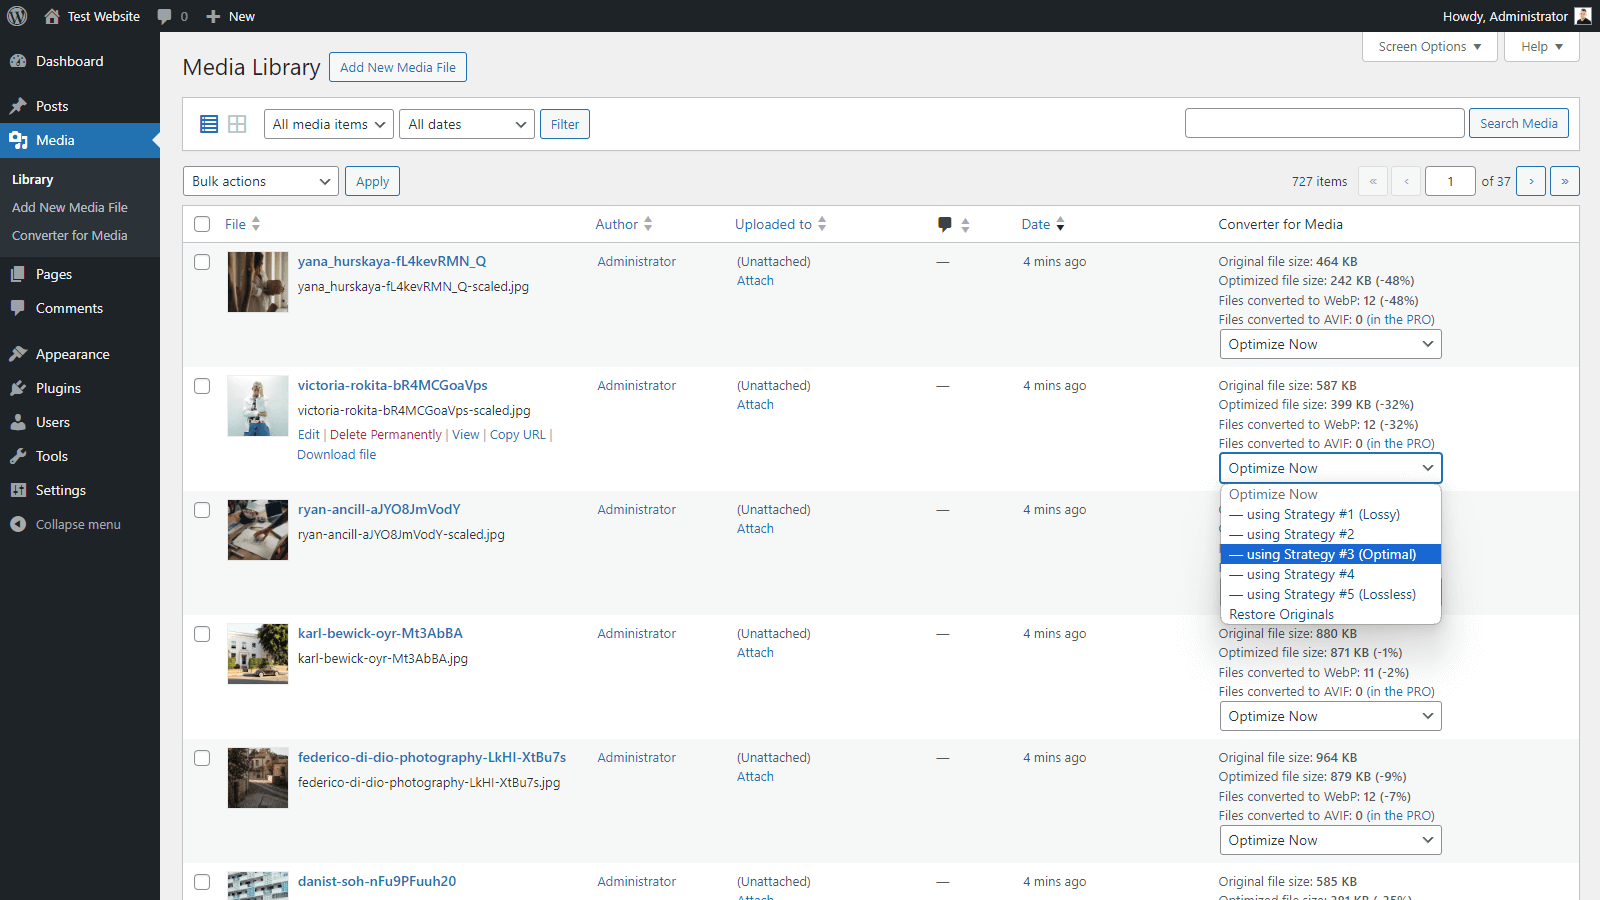
آمار بهینه سازی کتابخانه رسانه 
امکان لغو دستی بهینه سازی تصویر انتخاب شده
نصب
- Upload the plugin files to the
/wp-content/plugins/webp-converter-for-mediadirectory, or install the plugin through the WordPress plugins screen directly. - Activate the plugin through the
Pluginsscreen in WordPress Admin Panel. - Use the
Settings -> Settings -> Converter for Mediascreen to configure the plugin. - Click on the
Start Bulk Optimizationbutton and wait. - با استفاده از این آموزش بررسی کنید که آیا همه چیز خوب کار می کند.
اکنون وب سایت شما سریعتر بارگیری می شود!
سوالات متداول
-
چگونه پشتیبانی فنی دریافت کنیم؟ (قبل از اینکه کمک بخواهید)
-
قبل از اینکه یک موضوع جدید اضافه کنید، ابتدا تمام سؤالات دیگر در این سؤالات متداول و سایر موضوعات در انجمن پشتیبانی را بخوانید . شاید کسی مشکل مشابهی داشته و حل شده است.
هنگام اضافه کردن یک موضوع، این مراحل را دنبال کنید و به هر یک از آنها پاسخ دهید:
1. آیا در صفحه تنظیمات افزونه خطایی دارید؟ لطفا در صورت داشتن هر گونه خطایی این تاپیک را بخوانید.
2. آدرس سایت شما.
3. اسکرین شات از برگه Help Center در صفحه تنظیمات افزونه – لطفاً از کل صفحه عکس بگیرید.
4. لطفاً آزمایشی را انجام دهید که در سؤالات متداول در سؤال “چگونه بررسی کنیم که افزونه کار می کند؟” توضیح داده شده است. لطفاً یک اسکرین شات از Devtools به همراه نتایج آزمایش ارسال کنید.
لطفاً به یاد داشته باشید که پاسخ همه سؤالات را با اضافه کردن یک موضوع درج کنید. بسیار ساده تر است و حل مشکل شما را تسریع می کند.
-
پیکربندی برای Nginx
-
اگر از سرور Nginx استفاده می کنید که از قوانین htaccess. پشتیبانی نمی کند، پیکربندی سرور Nginx اضافی برای کارکرد صحیح افزونه مورد نیاز است.
لطفا برای اطلاعات بیشتر این آموزش را بخوانید.
-
پیکربندی برای Nginx Proxy
-
اگر از سرور Nginx استفاده میکنید که از قوانین htaccess. پشتیبانی میکند، اما همچنان در صفحه تنظیمات افزونه خطای پیکربندی سرور دارید، پیکربندی سرور Nginx اضافی برای کارکرد صحیح افزونه مورد نیاز است.
لطفا برای اطلاعات بیشتر این آموزش را بخوانید.
-
خطا در صفحه تنظیمات افزونه؟
-
اگر در صفحه تنظیمات افزونه خطایی دارید، ابتدا آن را با دقت بخوانید. زمانی نمایش داده می شوند که مشکلی در پیکربندی سرور یا وب سایت شما وجود داشته باشد.
پیام ها برای کاهش تعداد درخواست های پشتیبانی که تکرار می شوند طراحی شده اند. در وقت شما و ما صرفه جویی می کند. لطفا برای اطلاعات بیشتر این تاپیک را بخوانید.
-
خطا در هنگام تبدیل؟
-
هنگام تبدیل می توانید چندین نوع خطا دریافت کنید. اول از همه مطالب آنها را با دقت مطالعه کنید. در بیشتر موارد، شما می توانید این مشکل را خودتان حل کنید. سعی کنید این کار را انجام دهید یا با مدیر سرور تماس بگیرید.
اگر با خطا مواجه شدید:
File "%s" does not exist. Please check file path.به این معنی است که تابع file_exists() در PHP با استفاده از مسیر فایل داده شده در پیام خطاfalseبرگرداند. این مسیر را بررسی کنید و مطمئن شوید که درست است.اگر با خطا مواجه شدید:
File "%s" is unreadable. Please check file permissions.به این معنی است که تابع is_readable() در PHP با استفاده از مسیر فایل ارائه شده در پیام خطاfalseبرگرداند. مجوزهای فایل و دایرکتوری که فایل در آن قرار دارد را بررسی کنید.اگر با خطا مواجه شدید:
"%s" is not a valid image file.یعنی فایل به نوعی آسیب دیده است. فایل را روی دیسک دانلود کنید، با استفاده از هر برنامه گرافیکی دوباره آن را ذخیره کنید و دوباره به صفحه اضافه کنید. اگر خطا برای تصاویر جداگانه اعمال شود، می توانید آن را نادیده بگیرید – فقط تصاویر اصلی بارگیری می شوند، نه WebP.اگر خطایی دریافت کردید:
Image "%s" converted to .webp is larger than original and converted .webp file has been deleted.یعنی وزن تصویر اصلی کمتر از WebP است. این زمانی اتفاق می افتد که تصاویر قبلاً فشرده شده باشند. گزینه «حذف خودکار فایلها با فرمتهای خروجی بزرگتر از اصلی» را در تنظیمات افزونه غیرفعال کنید تا همیشه از WebP استفاده کنید. -
پیش نیازهای افزونه چیا هست؟
-
عملا هر میزبانی این الزامات را برآورده می کند. شما باید حداقل از PHP 7.0 استفاده کنید و پسوند
GDیاImagickرا نصب کنید. برنامه افزودنی بایدWebP formatپشتیبانی کند. اگر خطایی دارید که میگوید کتابخانه GD یا Imagick نصب نشده است، اما آن را نصب کردهاید، احتمالاً پیکربندی اشتباهی داشتهاند و از WebP پشتیبانی نمیکنند.آنها به پسوندهای بومی PHP نیاز دارند که در میان سایر موارد توسط وردپرس برای تولید تصاویر کوچک استفاده می شود. سرور شما باید ماژولهای
mod_mime،mod_rewriteوmod_expiresرا نیز فعال داشته باشد.نمونه ای از پیکربندی صحیح سرور را می توانید در اینجا بیابید. پیوند به پیکربندی فعلی شما را میتوانید در برگه Help Center در صفحه تنظیمات افزونه پیدا کنید.
به مواردی که با رنگ قرمز مشخص شده اند توجه کنید. اگر مقادیر مشخص شده با رنگ قرمز در مورد شما ظاهر نمی شود، به این معنی است که سرور شما شرایط فنی را برآورده نمی کند. به مقدار پشتیبانی WebP برای کتابخانه GD و WEBP در لیست افزونه های پشتیبانی شده برای کتابخانه Imagick توجه کنید.
در شرایطی که سرور شما الزامات فنی را برآورده نمی کند، لطفاً با مدیر سرور خود تماس بگیرید. ما قادر به کمک به شما نیستیم. لطفا در مورد این موضوع با ما تماس نگیرید، زیرا این یک مشکل پیکربندی سرور است، نه یک افزونه.
همچنین REST API باید فعال باشد و بدون محدودیت اضافی کار کند. اگر مشکلی با آن دارید، لطفاً با توسعه دهنده ای که وب سایت شما را ایجاد کرده است تماس بگیرید. او باید به راحتی مشکل کار نکردن REST API را پیدا کند.
-
چگونه بررسی کنیم افزونه کار میکنه؟
-
می توانید اطلاعات بیشتری در مورد نحوه کار این افزونه در کتابچه راهنمای ما بیابید.
-
چگونه محل آپلودها رو تغییر بدیم؟
-
این کار با استفاده از انواع فیلترهای زیر برای تغییر مسیرهای پیش فرض امکان پذیر است. این یک راه حل برای کاربران پیشرفته است. اگر نیستید، لطفا از این سوال صرف نظر کنید.
مسیر دایرکتوری نصب ریشه وردپرس (به طور پیش فرض
ABSPATH) :add_filter( 'webpc_site_root', function( $path ) { return ABSPATH; } );مسیرهای دایرکتوری ها (نسبت به دایرکتوری ریشه) :
add_filter( 'webpc_dir_name', function( $path, $directory ) {
    switch ( $directory ) {
        case 'uploads':
            return 'wp-content/uploads';
        case 'webp':
            return 'wp-content/uploads-webpc';
        case 'plugins':
            return 'wp-content/plugins';
        case 'themes':
            return 'wp-content/themes';
    }
    return $path;
}, 10, 2 );
توجه داشته باشید که دایرکتوری
/uploads-webpcباید در همان سطح تودرتو با دایرکتوری های/uploads،/pluginsو/themesباشد.پیشوند در URL دایرکتوری
/wp-content/یا معادل آن (استفاده شده در htaccess.) :add_filter( 'webpc_htaccess_rewrite_path', function( $prefix ) { return '/'; } );برای نمونه ساختار سفارشی وردپرس زیر:
...
├── web
    ...
    ├── app
    │   ├── mu-plugins
    │   ├── plugins
    │   ├── themes
    │   └── uploads
    ├── wp-config.php
    ...
از فیلترهای زیر استفاده کنید:
add_filter( 'webpc_site_root', function( $path ) {
    return 'C:/WAMP/www/project/web'; // your valid path to root
} );
add_filter( 'webpc_htaccess_rewrite_path', function( $prefix ) {
    return '/';
} );
add_filter( 'webpc_dir_name', function( $path, $directory ) {
    switch ( $directory ) {
        case 'uploads':
            return 'app/uploads';
        case 'webp':
            return 'app/uploads-webpc';
        case 'plugins':
            return 'app/plugins';
        case 'themes':
            return 'app/themes';
    }
    return $path;
}, 10, 2 );
پس از تنظیم فیلترها در پنل مدیریت به
Settings -> Converter for Mediaبروید و دکمهSave Changesرا کلیک کنید. فایل های.htaccessبا قوانین مناسب باید در دایرکتوری های/uploadsو/uploads-webpcایجاد شوند. -
چگونه محلی رو از تبدیل کردن خارج کنیم؟
-
برای حذف دایرکتوری های انتخاب شده، از فیلتر زیر استفاده کنید:
add_filter( 'webpc_supported_source_directory', function( bool $status, string $directory_name, string $server_path ): bool {
    $excluded_directories = [ 'my-directory' ];
    if ( in_array( $directory_name, $excluded_directories ) ) {
        return false;
    }
    return $status;
}, 10, 3 );
برای حذف فایل های انتخاب شده از فیلتر زیر استفاده کنید (در این مورد با پسوند “-skipwebp” در نام فایل، به عنوان مثال image-skipwebp.png) :
add_filter( 'webpc_supported_source_file', function( bool $status, string $file_name, string $server_path ): bool {
    $excluded_suffix = '-skipwebp';
    if ( strpos( $file_name, $excluded_suffix . '.' ) !== false ) {
        return false;
    }
    return $status;
}, 10, 3 );
Argument
$server_pathمسیر سرور مطلق به یک فهرست یا فایل است. در داخل فیلترها، در صورت نیاز می توانید قوانین پیچیده تری را اعمال کنید.فیلترها قبل از تبدیل تصاویر اجرا می شوند – آنها دیگر از تصاویر تبدیل شده پشتیبانی نمی کنند. اگر نباید تبدیل شوند، باید آنها را به صورت دستی حذف کنید.
-
پشتیبانی از پوشههای سفارشی
-
این افزونه به طور پیش فرض از دایرکتوری های زیر پشتیبانی می کند: –
/gallery–/plugins–/themes–/uploadsاگر میخواهید برای یک فهرست سفارشی پشتیبانی اضافه کنید، کد زیر را به فایل functions.php در فهرست تم خود اضافه کنید (به جای
custom-directoryاز یک نام دایرکتوری درست استفاده کنید) :add_filter( 'webpc_source_directories', function ( $directories ) { $directories[] = 'custom-directory'; return $directories; } );به یاد داشته باشید که این دایرکتوری باید در پوشه
/wp-contentواقع شود. -
چگونه بصورت دستی تبدیل را احرا کنیم؟
-
به طور پیش فرض، با کلیک بر روی دکمه
Start Bulk Optimization، همه تصاویر تبدیل می شوند. علاوه بر این، هنگامی که فایلهای جدیدی را به کتابخانه رسانه خود اضافه میکنید، تبدیل به صورت خودکار انجام میشود.به یاد داشته باشید که افزونه ما تصاویر تولید شده توسط وردپرس را در نظر می گیرد. افزونه های زیادی وجود دارند که به عنوان مثال، تصاویری با اندازه های مختلف یا در نسخه های مختلف تولید می کنند.
اگر می خواهید با افزونه خود که توسط خودتان تصاویر تولید می کند یکپارچه شوید، می توانید این کار را انجام دهید. افزونه ما امکان این نوع ادغام را فراهم می کند. این برای همه تصاویر موجود در فهرست
/wp-contentکار می کند.این یک راه حل برای کاربران پیشرفته است. اگر می خواهید با افزونه دیگری ادغام شوید، بهتر است با نویسنده آن افزونه تماس بگیرید و اطلاعاتی در مورد اقدامات موجود در افزونه ما به او بدهید. این به شما کمک می کند سریعتر راه حلی پیدا کنید.
شما می توانید به صورت دستی تبدیل فایل های انتخاب شده را اجرا کنید، می توانید از عملی استفاده کنید که یک آرایه را با لیستی از مسیرها به آن ارسال می کنید (آنها باید مسیرهای سرور مطلق باشند) :
do_action( 'webpc_convert_paths', $paths, true );یک روش جایگزین این است که به صورت دستی تبدیل پیوست انتخابی را با ارسال شناسه پست از کتابخانه رسانه شروع کنید. به یاد داشته باشید که این عمل را پس از ثبت تمام اندازه های تصویر (یعنی پس از اجرای تابع
add_image_size) اجرا کنید:do_action( 'webpc_convert_attachment', $post_id, true );برای حذف فایل های تبدیل شده به صورت دستی، از عمل زیر استفاده کنید و به عنوان آرگومان آرایه ای از مسیرهای سرور مطلق به فایل ها ارائه دهید (با این کار فایل های تبدیل شده به صورت دستی حذف می شوند) :
do_action( 'webpc_delete_paths', $paths ); -
پشتیبانی از WP-CLI
-
این افزونه از WP-CLI پشتیبانی می کند که تبدیل تصویر سریعتر را از سطح سرور امکان پذیر می کند. اطلاعات بیشتر در مورد نحوه شروع کار با WP-CLI را می توانید در کتابچه راهنمای کاربر بیابید. دستورات پشتیبانی شده در زیر توضیح داده شده است.
بررسی حداکثر تعداد تصاویر برای تبدیل در وب سایت:
wp converter-for-media calculateتبدیل تمامی تصاویر:
wp converter-for-media regenerateتبدیل همه تصاویر (با گزینه “تبدیل اجباری مجدد همه تصاویر”):
wp converter-for-media regenerate --force -
افزونه از CDN پشتیبانی میکند؟
-
فایل های وب سایت (فایل های وردپرس) و تصاویر کتابخانه رسانه باید روی یک سرور باشند. اگر آنها هستند، همه چیز باید خوب کار کند.
اگر فقط تصاویر شما روی سرور CDN دیگری باشد، متاسفانه عملیات صحیح غیرممکن است، زیرا چنین تصاویری توسط سرور دیگری مدیریت می شوند.
لیست فعلی سرورهای CDN پشتیبانی شده: – BunnyCDN (قبل از استفاده به دستورالعمل ها مراجعه کنید)
نقد و بررسیها
توسعه دهندگان و همکاران
“مبدل برای رسانه – بهینه سازی تصاویر | تبدیل WebP & AVIF” نرم افزار متن باز است. افراد زیر در این افزونه مشارکت کردهاند.
مشارکت کنندگان“مبدل برای رسانه – بهینه سازی تصاویر | تبدیل WebP & AVIF” به 20 زبان ترجمه شده است. با تشکر از مترجمین برای همکاری و کمکهایشان.
ترجمه “مبدل برای رسانه – بهینه سازی تصاویر | تبدیل WebP & AVIF” به زبان شما.
علاقه مند به توسعه هستید؟
Browse the code, check out the SVN repository, or subscribe to the development log by RSS.
گزارش تغییرات
5.12.5 (2024-04-15)
[Fixed]Modification of plugin settings via filters
5.12.4 (2024-04-12)
[Fixed]Support for changed upload directory path based on absolute path from upload_path option[Fixed]UX of plugin settings page[Changed]Error message for rewrites_not_executed error in server configuration
5.12.3 (2024-03-19)
[Fixed]Support for changed upload directory path based on upload_path option
5.12.2 (2024-03-14)
[Changed]Verification of rewrites_not_executed server configuration error[Added]Support for changed upload directory path based on upload_path option[Added]Support for WordPress 6.5
5.12.1 (2024-02-15)
[Fixed]Verification of rewrites_not_executed server configuration error when there is also a problem with the Gd or Imagick libraries[Changed]Error message for bypassing_apache error in server configuration[Added]Possibility to add directory paths in the Excluded directories field in Advanced Settings
5.12.0 (2024-01-18)
[Changed]Statistics about bulk optimization process[Added]Expert settings to overwrite paths for rewrite rules[Added]Improvement in verifying operation of redirections
5.11.5 (2023-12-07)
[Added]Compatibility with PHP 8.3[Changed]Error message for rewrites_not_executed error in server configuration[Changed]Error message for bypassing_apache error in server configuration
5.11.4 (2023-11-13)
[Fixed]حذف فایل های WebP تبدیل شده برای فرمت AVIF از پوشه /uploads-webpc پس از حذف افزونه[Fixed]آمار پیشرفت تبدیل در WP-CLI[Changed]Error message for rewrites_not_executed error in server configuration[Changed]Error message for bypassing_apache error in server configuration[Changed]Error message for rewrites_cached error in server configuration
5.11.3 (2023-11-09)
[Fixed]تبدیل خودکار تصاویر از دایرکتوری /uploads، اما نه از کتابخانه رسانه[Added]Support for WordPress 6.4
5.11.2 (2023-10-16)
[Added]دکمه برای گسترش/کوچک کردن فهرست دایرکتوری ها برای بهینه سازی در بخش بهینه سازی انبوه تصاویر[Added]اطلاع رسانی در مورد الزامات افزونه در محیط وردپرس Playground
5.11.1 (2023-10-02)
[Fixed]Duplicated rewrite rules for .jpeg files[Changed]Error message for rewrites_not_executed error in server configuration
5.11.0 (2023-09-27)
[Added]Ability to manually optimize selected images in Media Library[Added]Ability to manually undo optimization of selected images in Media Library
برای مشاهده تغییرات نسخه های قبلی changelog.txtرا ببینید.